
There are 2 ways to import transactions into QuickBooks Online: automatic and manual.
We’ll show you how to import data into QuickBooks using both methods — and explain when to use either option.
-
Tip: We recommend opening a business banking account if you haven’t already. Separating business from personal transactions makes it easier for your accountant to manage your business.
Connect Your Bank Account to QuickBooks
QuickBooks has features that let you automatically import banking transactions. If your bank has a partnership with QuickBooks, you can link your business account and avoid manual uploads.
Make sure you’ve set up an online banking account before completing the following steps. Have your online banking username and password on hand before you proceed.
1. Find Your Bank in QuickBooks
Log into your QuickBooks account. Then, from the main dashboard, look for “Banking” in the sidebar and click it.
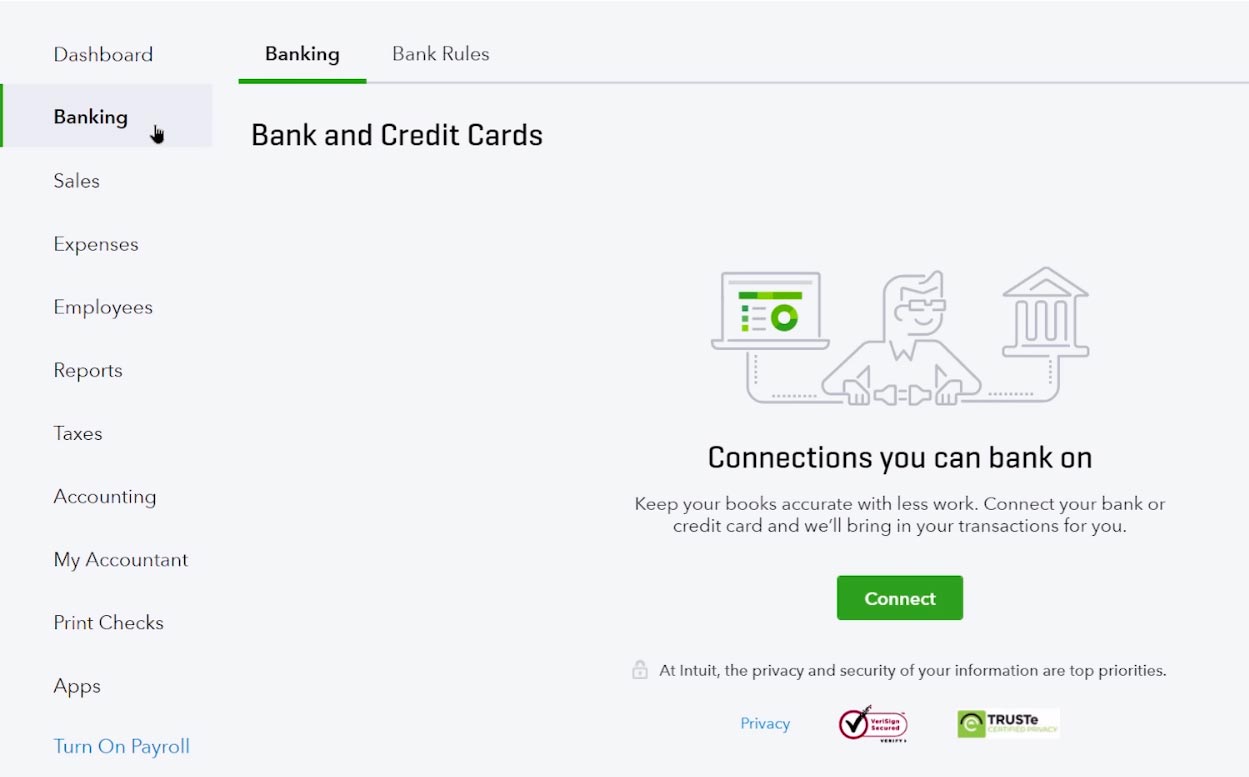
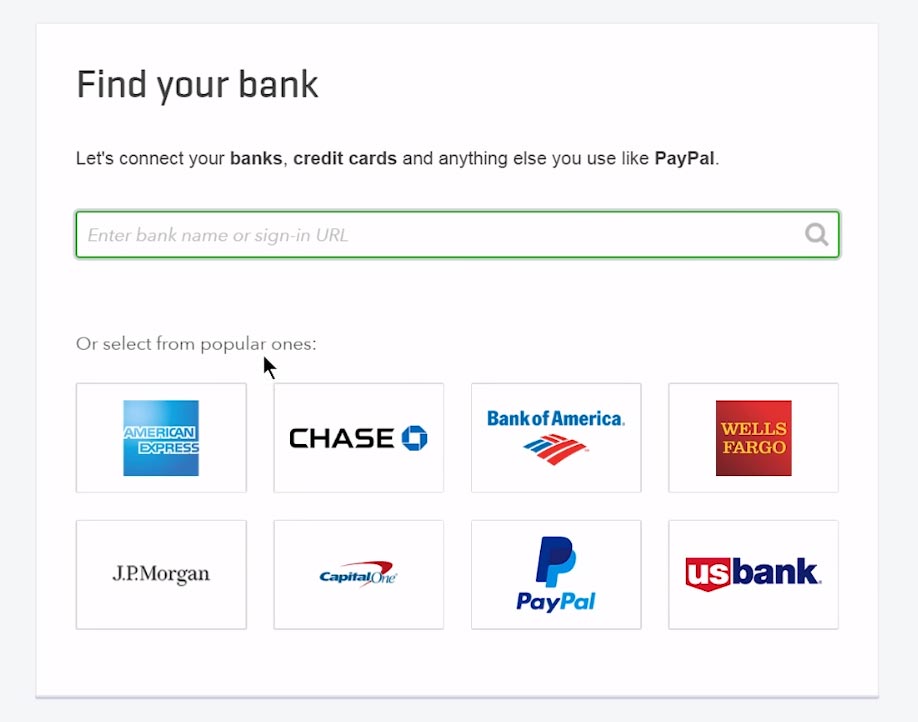
Search for your bank using either the search bar or by choosing from the list right below it. Click “Connect.”
2. Log Into Your Online Banking Account
After you select a bank account, a login prompt will pop up.
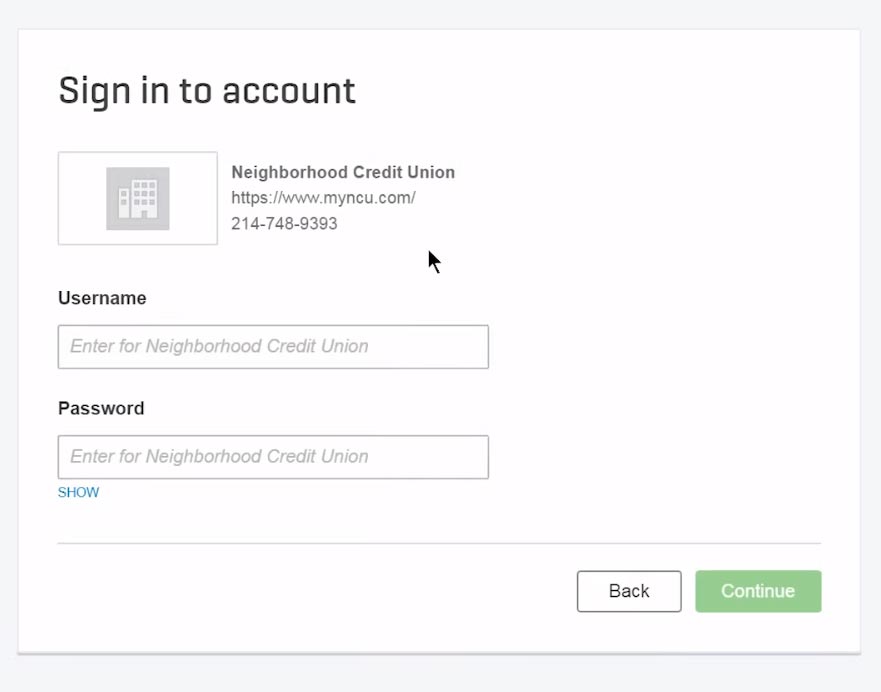
Enter your online banking credentials to give QuickBooks access to your account.
3. Link a Bank Account
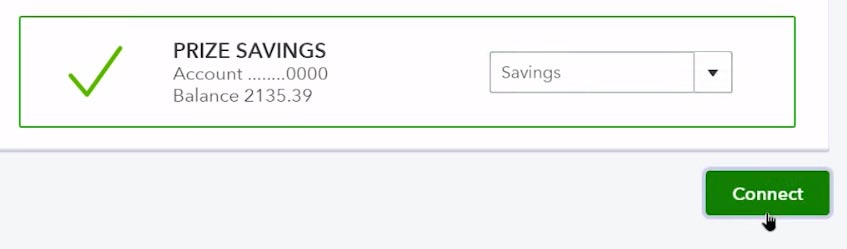
If you have more than 1 account with your bank, select which account you want to connect and import transactions into QuickBooks. You can connect additional accounts after you link the first.
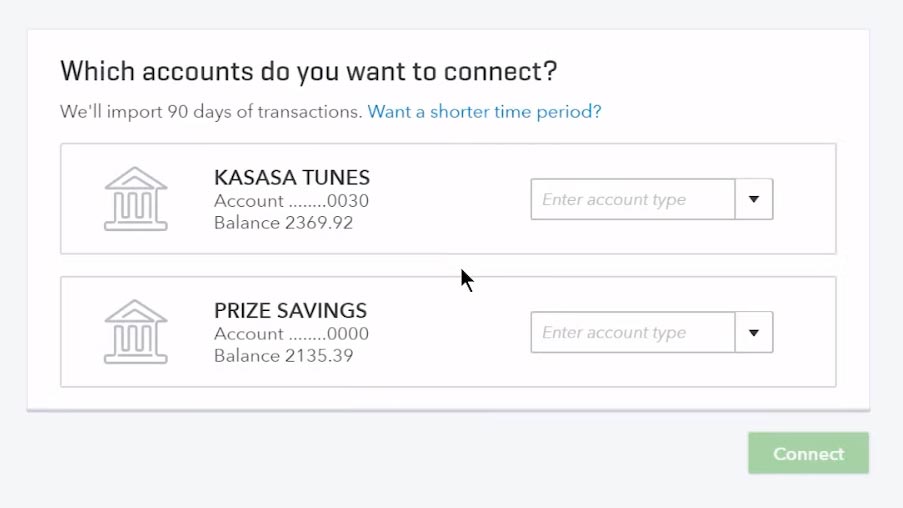
Note that QuickBooks will let you select a date range after you configure your account. You can connect up to only 90 days of bank transactions.

There’s a drop-down menu right next to your account information. Open the menu and select “Add Account.”
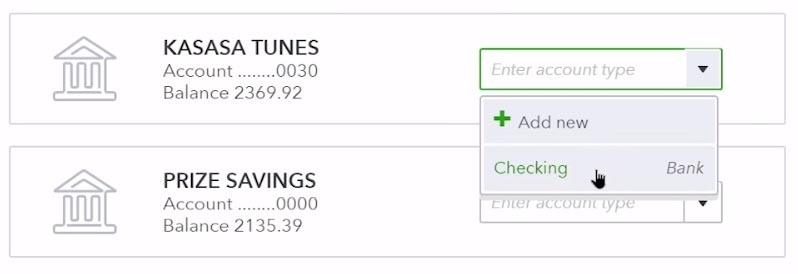
Then you can configure your account details. Make sure you fill in all the fields, especially if you’ll be connecting more than 1 account, to prevent any confusion.
- Account Type: Select whether the account is a bank or a credit card account.
- Detail Type: Describe the account you’re setting up. Is it a checking account? A savings account? Choose from 1 of the options provided.
- Account Name: Enter how you want this account to appear inside QuickBooks.
- Account Description: Use this space to describe further the account you’re connecting to.
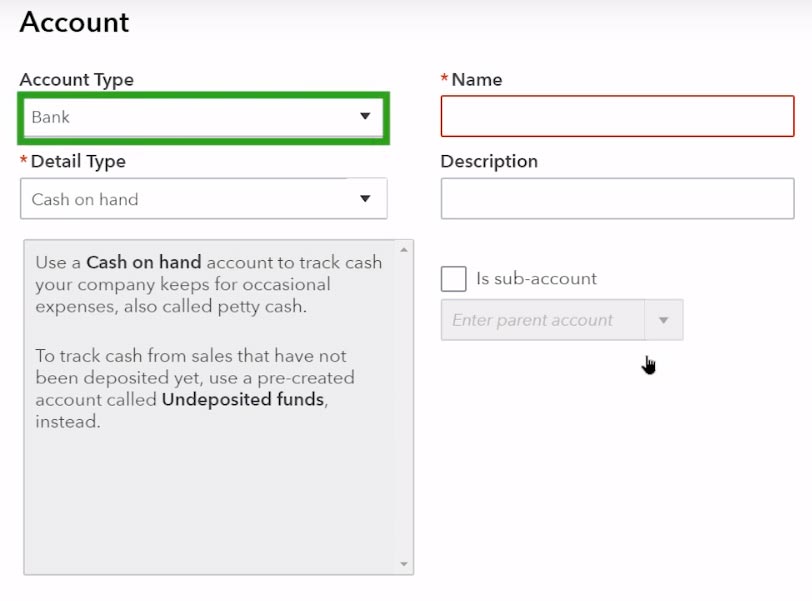
Once you’re finished, click “Save” and “Close.”
4. Connect and Review Transactions
When you’re ready, click the “Connect” button to sync your transactions.
QuickBooks Online will import transactions into the system.
Note that all imported transactions will be labeled “For Review.” This is because you’ll need to check each and approve them to verify the date when the transaction took place, the amount involved and the account number used.
When to Manually Import Transactions into QuickBooks
There are 3 main reasons why you’d want to use the manual method:
- You can only connect transactions going back 90 days, so if you need to connect transactions from 4, 5 or 12 months prior, you’ll need to import them manually.
- If you already have automatic transactions enabled but need to add more dates.
- Smaller banks might not partner with QuickBooks, so you’ll have to regularly import data into QuickBooks from Excel, Google Sheets or another digital spreadsheet.
-
Note: Before you begin, make sure you’re not submitting duplicate transaction entries. To find the earliest transaction in your QuickBooks account, refer to this QuickBooks guide on determining an opening balance.
How to Manually Import Transactions Into QuickBooks
1. Secure a Copy of Your Bank Transactions
Log into your online banking account. From there, you can download copies of your banking transactions.
Every bank uses its own interface. If you’re unsure how to download your transactions, get in touch with a representative for instructions.
2. Save Your Transaction Details in the Correct Format
QuickBooks accepts entries in 3 formats: comma-separated values (CSV) files, QFX (Quicken) files and QBO (QuickBooks Online) files.
The company suggests that you download files in QBO format if your bank offers that option. This way, your banking information is ready for immediate upload.
But if that option is unavailable, you’ll have to manually edit your file and then import transactions into QuickBooks from Excel or other software that supports this format. QuickBooks has a complete guide on how to prepare your transactions in Excel. You’ll want to use a 3- or 4-column spreadsheet.
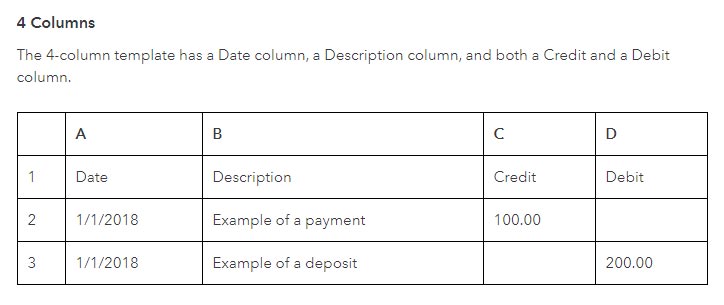
A 3-column spreadsheet should contain a column for the date, a description and the amount.
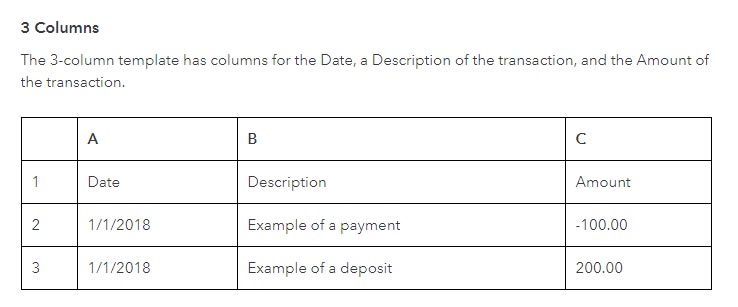
A 4-column setup contains a date, description, credit and debit column.
QuickBooks won’t accept CSV spreadsheets arranged differently.
On top of the column requirements, be aware of the following restrictions:
- No special characters: This includes the dollar sign ($) and the #, %, &
- No commas: For example, write 5890 instead of 5,890
- Use blanks in place of zero: Don’t use 0 as an amount. If the cell is supposed to represent $0, leave the cell blank.
- No brackets: If the cell is supposed to have a negative value, use the minus sign before the number. So write -567 and not (567).
- Use a standard date format: Record your transaction dates in the following format: Month/Day/Year. QuickBooks will reject other formats, such as “Thursday, March 3.”
3. Upload Your Spreadsheet
There are 2 ways to import transactions into QuickBooks Online from Excel or other spreadsheets.
If your banking accounts are connected to QuickBooks:
Go to the Banking menu. Then, click the “Banking” tab.
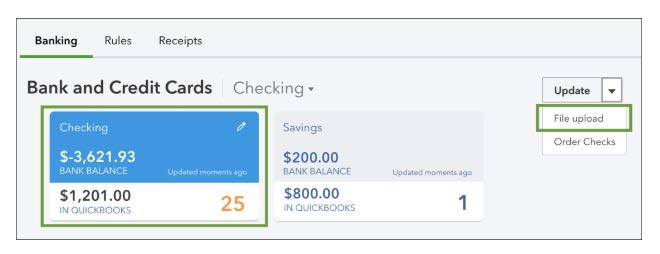
Select the account where you’ll want to upload the transactions. Then select “File Upload” from the drop-down menu.
If your banking accounts aren’t connected to QuickBooks:
Go to “Banking” and select “Upload Transactions.”
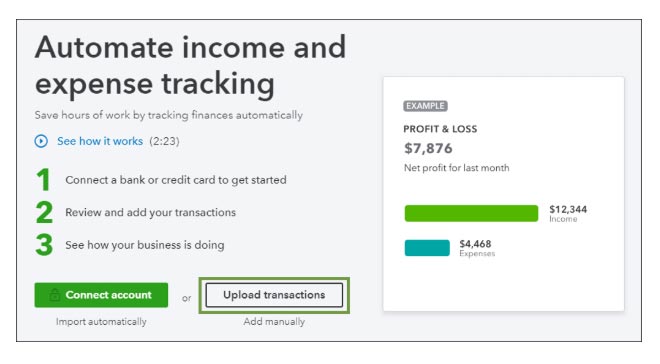
This will let you import Excel or other software files into QuickBooks. When you upload your transactions, you might be asked to create a new account.
Browse your computer for the CSV file you want to upload.
Select the file and click “Next.”
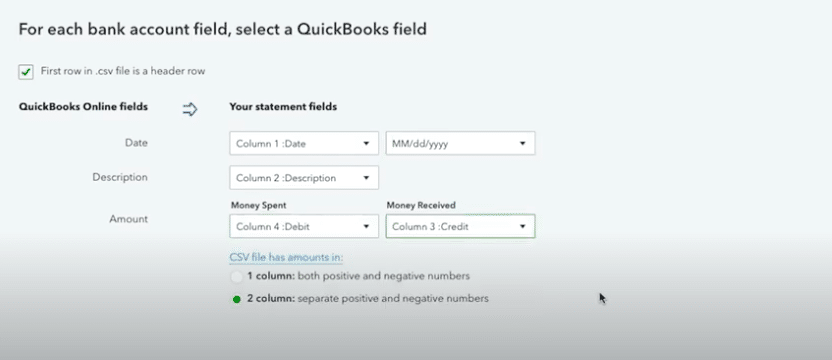
4. Map Your Transactions
Match the columns on your spreadsheet with the appropriate QuickBooks field as you import the data into QuickBooks.
Then select the checkbox next to each transaction you want to import. After that, select “Next.”
5. Confirm That QuickBooks Will Import Transactions
A dialog box will prompt you to confirm you want to upload those transactions. Click “Yes.”
Then select “Let Us Go” to accept all transactions and go to your account.
6. Confirm the Uploaded Information’s Accuracy
In the “Banking” screen, click the “Banking” tab. On this screen, you’ll see 3 new tabs; click the “For Review” tab.
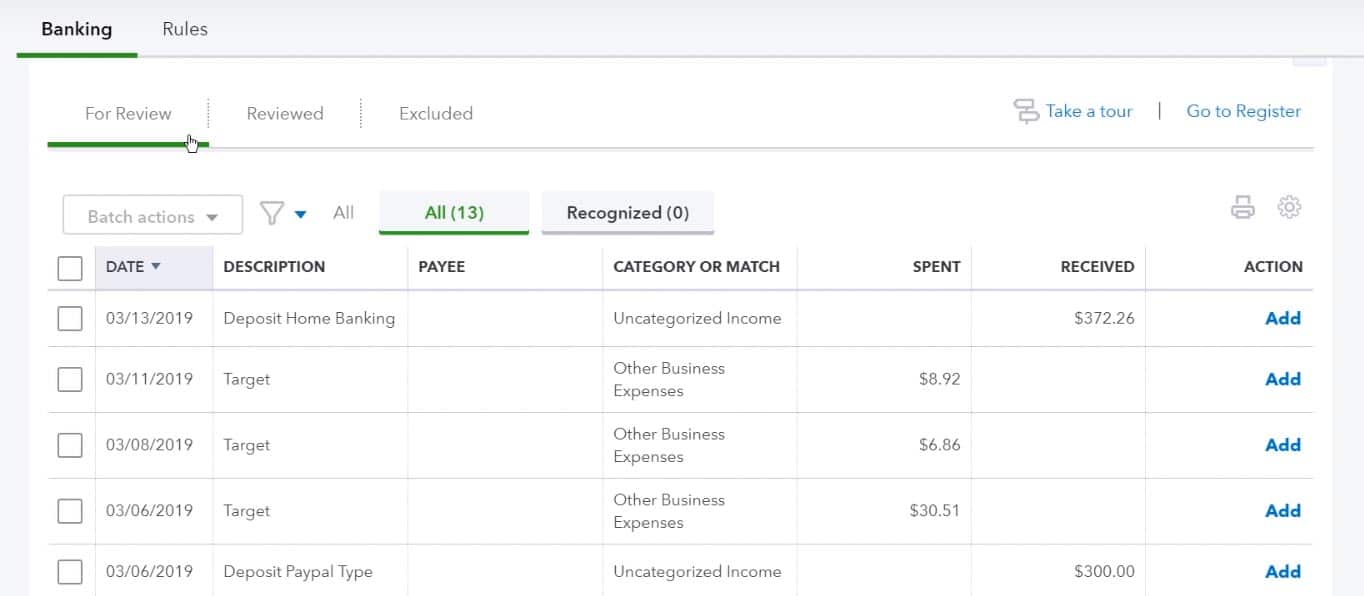
You’ll find a list of all transactions that haven’t been verified yet. Clicking on any transaction will reveal more information.
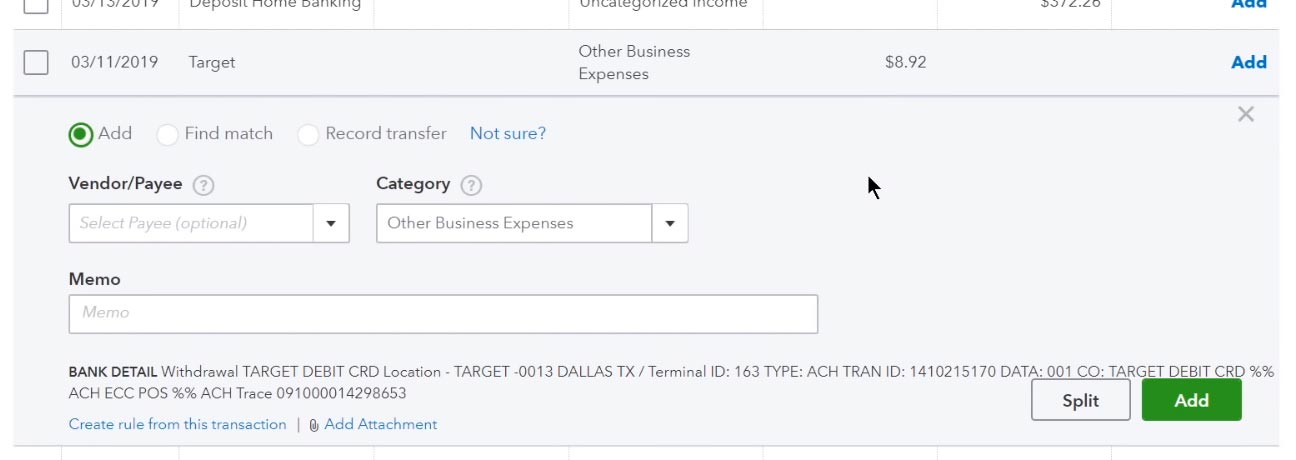
You can enter details such as the vendor or payee name, a category to file the transaction under and a memo for future reference.
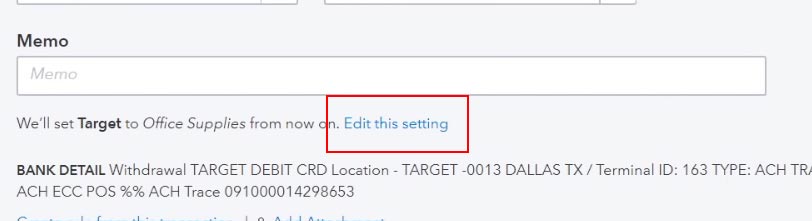
By default, QuickBooks will match the details you enter with other entries from the same vendor. If you don’t want this, you can edit your settings to disable the feature.
Once you’re finished updating the details, you can click “Add” to finish. This will add the transaction to your list of existing QuickBooks imports.
All QuickBooks images sourced from the Quickbooks Help page